|
Making Of

>>>
Sign up for the FREE newsletter
<<<
"Making of" is a section where i will share the problems / solutions to
some of my work - as they unfold, during the creation process. First up is
a large scale alien invasion image, posed in Daz|Studio, exported and
rendered in Lightwave and eventually postworked in Photoshop.
The Making of "The
Invasion" Part 1 - The First Steps
One of my favorite images at RO, is
the MAGNIFICENT "War of the Worlds - Men Hunting" by czarnyrobert. It´s
just breathtaking.
I´ve always liked the theme. Since the Tripods TV-series, through
different movies - and also the PC game "Half Life 2" - these kind of
aliens have left a deep impact in my mind...
I´m terrible at modeling, so i´m gonna make use of ready to go models -
Stonemason's "The Backstreets", amoung others.
And ofcourse, due to the HUGE scale of this image - with TONS of objects -
Ligthwave will be the preferred software.
This image will take a LOT of time - and hopefully turn into something
beautiful and scaring.
I plan to insert an INSANE amount of details - characters and situations.
It won´t stop with a 100 of them... I want this to be HUGE.
I´ll keep all the small steps posted here as WIP´s (Work in progress
images).
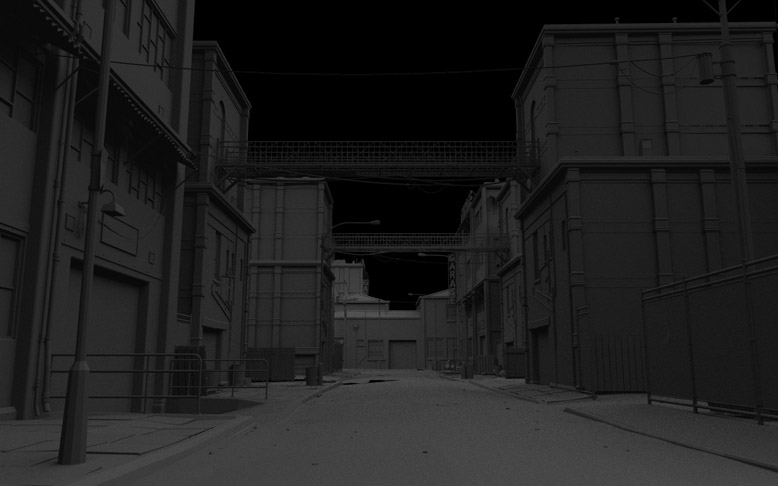
For now, i´ve just exported the Backstreets, and just layed out a quick
perspective view with simple light and no textures / surface adjustments /
transparent surfaces.
For sure - this will be a LOT of fun!
Thanks for watching!
And THANKS czarnyrobert for being such a GREAT inspiration and a
magnificent artist!
RO link to this post and comments.
The Making of "The
Invasion" Part 2 - Basic textures,
simple light & more models
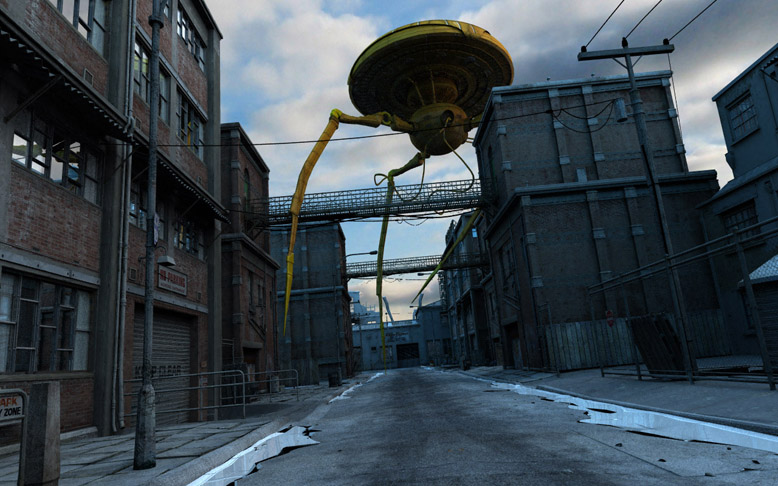
Ok, this is just a quick render with the
lowest possible antialiasing.
Here are the changes:
1. Added textures to the backstreets - just a quick job - and they still
need adjustments. For instance the windows would need a blurry reflection.
The buildings also look too tidy - so i might add some stains / dirt maps.
2. Added the Ruins by Stonemason at the horizon - but it´s untextured -
and i´ll need more of this. Maybe i´ll just replace the end of the street
with ruins? I want this feeling of DOOM coming closr - so showing off
destroyed buildings in the back is really appealing to me. Of course smoke
+ fire will be added later.
3. Added one cool alien guy from Daz. Think it´s called the War Machine.
Just a quick texturing on him. I still need to adjust his pose and the
tentacles. And two more of these cute guys will be thrown in later...
4. The water on the ground looks awful! No idea why it looks like that. (pixelated,
"broken" and rough). Will need to work on that.
5. Added a sky sphere, which i flipped the polygons on - so it´s not
doublesided. And we can just see the "inner" surface. In this way it
surrounds the scene without inflicting on the view. I sphere-mapped it
with a cool texture from Total Textures V3. It´s one of those panorama
textures - so i can rotate the camera anyway i want.
6. Light? There is no light here! LOL The Luminocity channel of the sky
sphere was adjusted to 100% and the Diffuse level to 0%. And the rest is
done by taking advantage of the Radiosity at the standard setting, but
amped up to 200%. Don´t you just LOOOOOVE this in Lightwave? A selfglowing
polygon will cast light and shadows when used with Radiosity. WOW!
Still, i´m not satisfied with the light. HDRI light or IBL looks great,
but looks too soft. I still need to add some sharp sun light into this -
to get those sharp shadows...
My idea is to have a sunny looking image - with the ruins/smoke/fire in
the background. Like a sunny, happy day - gone BAD... lol
7. I even put the camera a bit on the side (rotated it) - to add more
chaos feeling. Lowered the camera focal length to get a larger view. (More
wideangle)
8. This took a LOOOOONG time to render, so as i adjust this scene and put
in all the mayham into it - i won´t be using Radiosity on all the quick
renders.
9. Before adding TONS of models into this scene, i will optimize the
textures and models. For instance - the models in the background don´t
need to be high rez. I can propably remove 50-70% of the polygons and
still keep a decent look.
Also, the textures don´t need to be this huge. Especially in the back of
the scene. You know, just by scaling down a texture to half of it´s X/Y
size - like from 2048 x 2048 to 1024 x 1024 - it would take FOUR times
less memory. So, it would look half as high rez - but take 4 times less
memory. That´s good to know!
10. Still no haze / fog in this - but i will eventually add some of it -
to make the buildings far way - appear to be a bit more less intense.
Allright, i hope my Dual 3.4 Ghz, 4 Gb RAM machine will cope with this...
He he he...
Until next time folks!
MUHAHAHAHAHAHA
RO link to this post & comments.
The Making of "The
Invasion" Part 3 - Sun test,
window textures, car & guy
Oh, crap! I messed up! lol
Can you imagine? I´m rendering DRESSED people...
AND A GUY!!!!!!!!!!!!!!!!
I think i will turn into a mad man before this is done! Do you actually
think i can pull this one off? 100´s of models with CLOTHES???
Darn - i´m gonna need you guys... lol
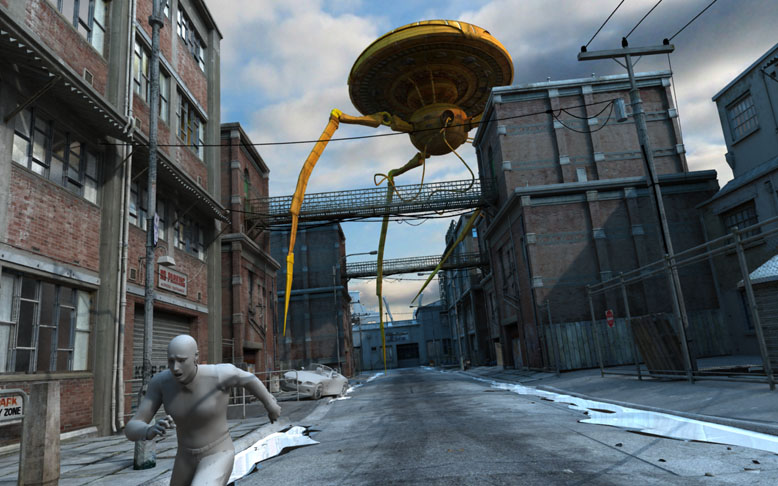
Anyway... Some changes since the last render...
And i don´t like the light... lol
1. Added a sun light to the previous light set up. Also, added some
ambient light. But somewhat, the DOOM mood is gone. It´s too bright! What
do you think guys?
2. Added some blur-effect to the windows reflections, but it doesn´t look
good. Gaaaaah - don´t you just loooooove texturing... lol
3. Added a dressed guy. Yeah, a GUY with CLOTHES. Man, i won´t be sleeping
tonight, i tell you! He´s not textured yet. Thanks god! If you almost
close your eyes, you can pretend he´s nude... Or - MAYBE NOT! That´s a BAD
idea... No, no, no i´m not like that at all... lol
4. Added a untextured BMW Z4 in the background or midground or whatever
it´s called. I will alter the cars geometry and deform the front. I want
it so be stuck in the fence. Oh - what a waste! Well, i´m not into BMW´s
anyway - so let´s wreck it! lol
5. Still rendered with Radiosity, with Enhanced Low antialiasing. Needed
to use Radiosity, to see how the sun light would affect the scene...
Rendering time is still ok. Just over 4 hours at 1280 x 800 resolution.
Not bad! I think i´ll go for 1600 x 1200 for the final one...
What can i say? I´m not that organized... I just throw in all the stuff,
and then see what needs to be fixed...
Hmmm... Haven´t heard of an "organized" artist... Is that a breed out of
this world?
Thank you all for your support! And the great ideas of collapsing one of
the buildings and adding cracks in the road from the aliens feet.
Great stuff!
Gaaaah - i´m gonna texture that guy this weekend... Will need a LOT of
coffee! lol
Aw man - i´m getting all these ideas
now... Sitting on the toilet! lol Don´t you find this amusing?
Whenever you need to crack an idea - just go to the toilet! No? Ok,
ok, ok - BAD IDEA! lol
I have this idea of people hanging out of the windows... A car stuck
in the aliens tentacles with people falling down...
The soon to be wrecked BMW - will have a person climbing out of the
car - and someone helping him/her out.
Somebody will just freeze and hide behind a pillar.
There need to be folks on the bridge up in the air...
Man - i´m gonna have som fun!!!!!!!!!!
And my PC will absolutely HATE me! LOL
I just wonder, how long the final render will take. 1600 x 1200
resolution, like atleast Enhanced High Antialiasing... Geeeeeeez...
40 hours?
Yepp, i´m gonna end up at an institution for people who have stipped
down their PC´s with a hammer... Send me a card will ya? lol
RO link to this post and comments.
The Making of "The
Invasion" Part 4 - Light fix,
V3/M3/car texture + deform, more aliens + ruins
Ahhhhhh - what a beautiful morning... I´m
sitting here, with a nice hot cop of coffee - with milk and sugar - and
enjoying the render my poor PC did (took 7.5 hours)... lol
As i mentioned in the comments section in part 3 - i got several ideas
yesterday. People hanging from the windows, a person trying to get out of
the wrecked BMW - and someone trying to help them get out.
A car hanging in the aliens tentacles with people falling down. People on
the nearest bridge. Someone hiding behind a corner. People lying on the
ground... And so on...
I´ve got all these ideas BOMBARDING my mind at the same time - and at
times it´s frustrating not to be able to just squeeze it all in at once...
It´s like my mind is always ahead of my body... lol
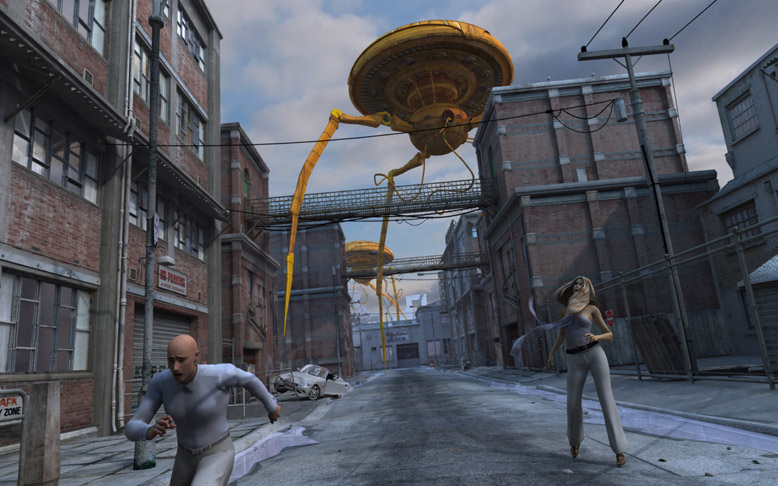
Anyway - i´m quite pleased with this nights render, and here´s my comments:
1. Adjusted the sun lights intensity down a bit. Adjusted ambient down a
bit aswell. And a bit less radiosity, but with greater accuracy in this
particular render. 5 x 15 for those who have Lightwave. (I´m using 6.5 by
the way)
2. Added a bit fog / haze - but it´s too strong at the horizon - and looks
weird aginst the sky. I think the sky would need to have a tinted effect -
like a shade added to it - that slowly goes away - the higher up in the
sky it goes. This would blend better with the fog seen on the ground. I
guess i can alter the texture in Photoshop. Or add an object at the back
of the scene, with a transparency map.
3. Textured the guy. Not entirely happy with the colors and texture. And
there´s a shadow from the sun on his shoulder. Need to fix that.
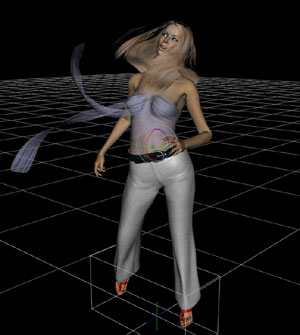 4. Added V3 to
the right. Love her expression, and i put quite some time into her pose -
and even posing her clothes in Daz|Studio - to get that "windy" stormy
effect. Works quite nice! 4. Added V3 to
the right. Love her expression, and i put quite some time into her pose -
and even posing her clothes in Daz|Studio - to get that "windy" stormy
effect. Works quite nice!
However, i don´t like the hair. Well, it looks windy and that it great.
But it doesn´t look like hair - It´s more of a plastic thing... To thick.
The transparency maps are there - but i would need to add my own to get
the hair more "thin".
Her textures work though.
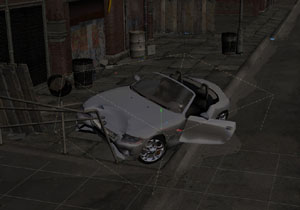 5.
Textured the car and added a morph to the mesh. I just selected parts of
the front, and added a new morph my moving / rotating those points and
using the magnet tool in Modeler. 5.
Textured the car and added a morph to the mesh. I just selected parts of
the front, and added a new morph my moving / rotating those points and
using the magnet tool in Modeler.
Not a pro job - and it looks quite ugly in the Open GL preview - but it
works in the render. A little smoke from the engine - and it will look
GREAT!
The cool things with Lightwave - is that when you create a morph in
Modeler - you can then adjust how much you want it to differ from the
original "morph". I ended up with 30% - after several renders.
6. Fixed the water a little. It´s more blue, more transparent and less
reflective. Looks better, but it´s not there yet. I think - if i don´t get
it right - i can:
Remove it completely and add my own on top of it - or just remove it.
7. Added another ruin in the background.
8. Added another alien guy. Aren´t those CUTE!!!!
9. Fixed one of the first aliens legs - because it can´t stand on one leg.
Now that we can´t see the third leg, we assume it´s in the ground. And
that works fine...
Next i will propably fix a crack in the ground under the leg that actually
touches it. Thanks for the idea!!
Need to fix the V3 hair.
Will add people trying to get out of the wrecked car.
Will propably add another car... He he he he!
I like where this i heading!!!
And have in mind - this render is NOT postworked. I plan to have minimal
postwork in the end. Just a small bloom effect. Maybe some additional
smoke/fire effects or dust. Or some lasers from the aliens...
MUHAHAHAHAHAHA... lol
Thank you SO MUCH for your support! I´m really gonna need you guys. This
HUGE project will propably take atleast 3-4 weeks before it´s done. And if
you ask me - that usually do a render within a couple of hours - this IS
HUGE... lol
And it´s a pleasure to post every step i take...
Enjoy your weekend folks!
RO link to this post and comments.
|
I have this idea of people hanging out of the windows... A car stuck in the aliens tentacles with people falling down...
The soon to be wrecked BMW - will have a person climbing out of the car - and someone helping him/her out.
Somebody will just freeze and hide behind a pillar.
There need to be folks on the bridge up in the air...
Man - i´m gonna have som fun!!!!!!!!!!
And my PC will absolutely HATE me! LOL
I just wonder, how long the final render will take. 1600 x 1200 resolution, like atleast Enhanced High Antialiasing... Geeeeeeez... 40 hours?
Yepp, i´m gonna end up at an institution for people who have stipped down their PC´s with a hammer... Send me a card will ya? lol