 |
|
|
|
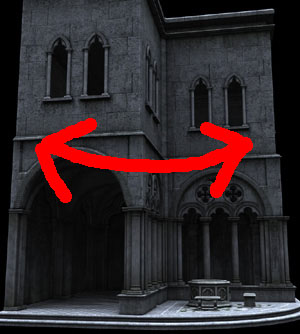
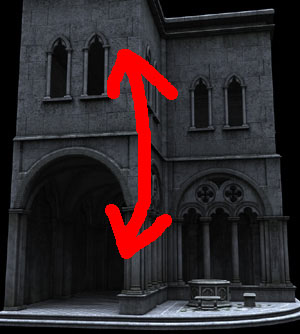
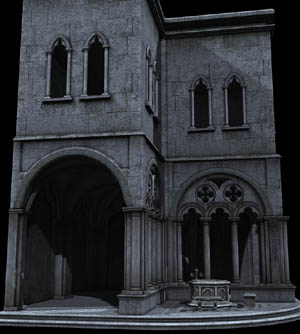
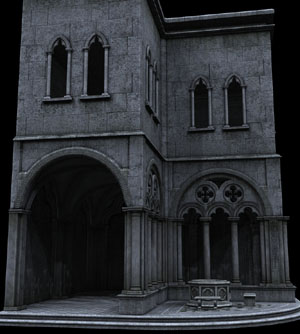
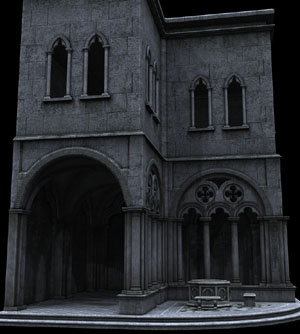
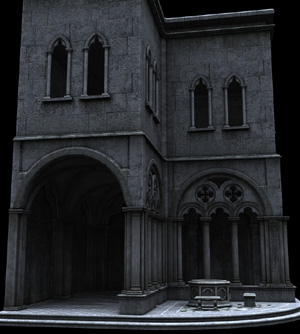
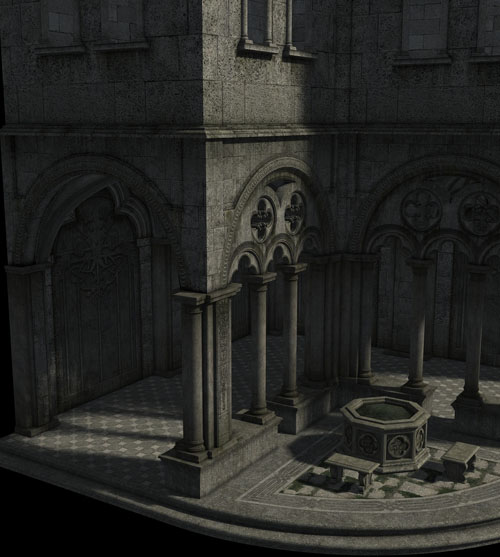
Part 3b: Selecting the right resolution / version - High EX is KING! Advanced Training Selecting the right resolution / version is important in two ways. First, regarding the quality of your render. Second, regarding rendering time. As you may already have read in part 3a, you know that you won´t always benefit from a higher resolution. Or even the EX versions. To demonstrate what the different resolutions really do - let´s put the LDP for a challenge. For this purpose we´ll be using the magnificent Cloisters prop from Red House Studios. It´s a really nice prop, with a lot of details, nice arches and some cooridors. To best show the effect of the resolutions, we´ll be using the Cloudy Preset, that comes without the Sun. This is to separate each part of the LDP and to get rid of any distractions. This test will show how the Sky Lights cope with extreme conditions and where you need to put attention, while selecting the right resolution for your project. The Sky Lights in the LDP, have two resolutions: X and Y. Or horizontal and vertical. While the Draft Mode offers X=4, Y=1 - the sophisticated High Rez has X=13 and Y=6. When you grasp this, and understand how the horizontal / vertical resolutions affect your image - selecting the resolution will be a breeze.
Horizontal resolution affects your image horizontally. Meaning - if you have corners, they will look much smoother - the higher the X resolution. If your scene has pillars or walls, a higher X resolution will cast smoother shadows around those objects. Characters will look better with a higher X resolution, but the difference will not be as visible as with for instance a building corner. Characters are pretty small, and often round in shape - while buildings offer a bigger scale and more rough / straight architecture. Vertical resolution affects your image vertically. In other words - the Sky Lights angle towards the ground differ - and therefore parts like arches, windows and similar - will have a smoother vertical shadow appearence. Higher Y resolution will also give the image more depth. This might seem a bit difficult to understand at first, but as we now will look at each and every resolution - all the pieces will come together. The actual rendering times are total rendering times (Shadow Maps + Rendering) on a Dual Core 3.4 Ghz Win XP PC with 4 Gb of RAM and a Nvidia Quadro graphic card.
X=4, Y=1: Rendering time: 4 min 24 sec Allthough being very fast on a decent machine - the Draft Mode lacks in quality. Notice the corner on 2nd floor, where the two walls meet. You can clearly see the "shadow edges". Also, notice the left and right arch and the corridor. Same thing! However, there´s an interesting thing about the Draft Mode. And that´s flat walls. Look at the top left window pair. That wall looks almost "clean". Notive that area as we increase the resolution - as it won´t improve much! Draft is best suited for a fast preview - and for characters. Or as you may have read about in Part 3a - the BMW!
V-Low Rez X=9, Y=1: Rendering time: 8 min 27 sec V-Low or Very Low was added as a free upgrade to fill the gab between Draft Mode and Low Rez. It renders at twice the speed of Low, while having twice the quality of Draft. Imediatelly, we can see a difference in the arch area, as more shades are added. We can also se more shades in the corner on 2nd floor. Still, the V-Low is a compromise, and not a quality resolution
Low Rez X=18, Y=1: Rendering time: 15 min 52 sec This is the last single Y resolution. With the extra X-resolution, the Low Rez looks preety good! Improvement can be seen all over the image. It´s time to add a bit more vertical depth...
Single Y Resolutions vs Multiple Y resolutions Notice that the Draft, V-Low and Low resolutions all have Y=1. This means that you only increase the X resolution, when moving from Draft to Low. Now, as we step up to Medium and High, the Y resolutions will be increaed aswell. But, in order to keep down the rendering time, the X resolution does a small step down - from Low´s X=18, to Medium´s X=12 and High´s X=13. This sounds like a real draw back - but in reality - the increaised Y resoltion, more than covers that gap.
Medium Rez X=12, Y=3: Rendering time: 29 min 51 sec Notice the extra depth in below the both arches. Despite the lowered X-resolution, the corner at 2:nd floor still looks smooth. This is due to the increasied Y resolution that covers the gab. Allthough, this being a very difficult situation for LDP - Medium Resolution will look very good in most cases.
High Rez X=13, Y=6: Rendering time: 1 hour 4 min 15 sec The Holy Grail! Or Holy #%¤! Yepp, High Rez = Quality. Almost flawless. Now, there are ways of making the lights co-operate even more in hard places like the arches/corridor. This is done by either moving the Sky Target or Squeezing the whole dome. More on this and other cool techniques in part 3c! A small nostalgic note here: The original LDP version, had X=18, Y=6 and produced stunning results - at the price of BAD renderings times...
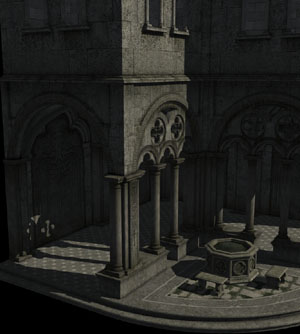
Basic vs EX Versions So what´s with the Extended (EX) versions? As you read in Part 3a, the EX´s only mission - is to add more realistic sun light shadows. The EX does NOT affect the sky lights. What are more realistic sun shadows then? If you take a closer look, a bright sunny day - you notice that a sun shadow - is very sharp just next to the object that casts it. If the shadow is long enough - you notice that it starts to fade away a little - and becomes more and more blurred the longer the distance. In the following examples, the Sky Lights have been removed, and the Ambient Lights amped to 5% to better show the Sun Shadows.
Basic Versions Draft, V-Low, Low, Medium and High versions are considered "Basic Versions". They all have a single sun light - giving a very sharp, a bit unrealistic look. Take a close look at the image to the left. The Sky Lights are removed, and the Ambient amped up to 5% - to better show the sun. Notice that the sun shadows are sharp all over the image. No matter where you look, and how long the shadows fall, they are still sharp. No matter what Basic Resolution you choose - the sun light will look the same. This means you won´t get a better sun wuality when switching from Draft to High. Basic versions render faster than EX versions. This is mostly noticed as you use the higher resolutions.
Low EX, Medium EX and High EX offer more realism, at the cost of additional rendering time. And again, EX affects ONLY the quality of the Sun Shadows. Consider the image to the right. You can spot both sharp shadows, like next the well, any pillar or the benches - and those gorgeous blurred shadows - like for instance in the corner on 2nd floor and below the left arch. Take a minute and really look close. You can spot razor sharp shadows all over the image - excacly where you would find them in real world. Here, because this prop is pretty small in scale - and not being a full city - the Sun Cube SCALE has been altered to 10%, instead of the default 1.5%. This means MORE blur effect! The HIGH EX will cope with such a large blur effect for this particular scene - and really turn an ordinary image into something beautiful.
EX versions Sun Shadow Blur Effect Low EX, Medium EX and High EX offer multiple sun lights - giving that special effect. EX adds to the rendering time, so choose it only if you can wait a bit longer - or/and if you need that extra effect. The higher the EX resolution - the smoother the sun shadows will be - and the bigger "Sun Blur Effect At A Distance" you can use without seeing the shadow edges. Take a look at the following images:
The first one, to the left, illustrates two things: 1) Basic versions will have the sun shadows look like this all over the image. 2) The EX versions, will have the sun shadows look like this CLOSE to the objects that casts the shadows. The main thing is: Sun shadows in real world are very sharp - but only close to the objects. Second image, in the middle, illustrates EX Low. This can be seen if the shadows appears at a distance from the objects that casts them. The longer the distance - the more of this artifact you may see. Note that EX Low will give good results if the distance is shorter. Also, you can always adjust the "Sun Light Blur Effect", by adjusting the Sun Cube SCALE. (1.5% being the default). If you lower the SCALE, you will increase the quality, but also the sharpness. If you increase the SCALE - you will loose quality - but increase the blur effect. Last image, the one to the right, illustrates High EX. The higher number of lights will make the shadows look very smooth. Note that while being High EX - only the shadows that fall at a distance will look like this. Shadows close to the objects will still look like the first image, to the left. So, now that you understand a bit more about the resolutions and versions - we need to take the LDP a step further - and really put it to the test with impossible situations. There´s really a lot more to this light set, with amazing adjustments to be made! More on that later! |
 Draft Mode
 EX Versions

|
Copyright 2005-2007 Waldemar Belwon. All Rights Reserved. |